Always On VPN in Azure Part 1
Hello everyone, this is my first post. Let’s start with the Always On VPN in Azure. To securely access your resources, it’s possible to configure the Always On VPN within Azure with the Azure VPN Gateway and enroll the VPN with Microsoft Intune. This is the first part of the series.
Prerequisites and decisions to make
- Azure Subscription
- Intune license (bundel with Azure Active Directory P1)
- Azure Active Directory (AzureAD Join) or Active Directory (Hybrid Domain Join)
- Windows 10/11 device (or VM) that is enrolled with intune (AzureAD or Hybrid)
- Windows 10/11 Pro (User tunnel) Enterprise (User and device tunnel)
- PKI environment (Windows server based or cloud based like SCEPMAN)
If you have no resources in Azure yet, it is well known that the latency with the Azure VPN Gateway could give issues on legacy apps or domain controller connectivity. You also need a supported firewall that can connect to the Azure VPN Gateway
First, we need to decide what kind of Always On VPN tunnel we are going to choose. We have two kinds of VPN tunnels.
User tunnel
- Works with Windows 10/11 Pro (also Windows 10/11 Enterprise)
- Can be protected with Conditional Access
- VPN comes up after Windows login
- NPS Role / Radius is needed for authentication
- Visible connection in Windows
Device tunnel
- Works with Windows 10/11 Enterprise (Not Windows 10/11 Pro)
- Conditional Access is not supported
- VPN comes up on device start (before the Windows login)
- Good for connectivity with Domain Controllers (Hybrid Domain Join), File Servers and Printservers (Password expires, Drive mappings, Printers, Hybrid Autopilot)
- The connection is not visible for the users
- No NPS / Radius needed
Picking the right VPN tunnel is essential for your business. Because it could impact the users and the security of your environment. It is possible to have two VPN tunnels on the same device. So, you can combine the User tunnel with the Device tunnel. This is only possible on Windows 10/11 Enterprise. In Azure you will need two Azure VPN Gateways to make this solution possible.
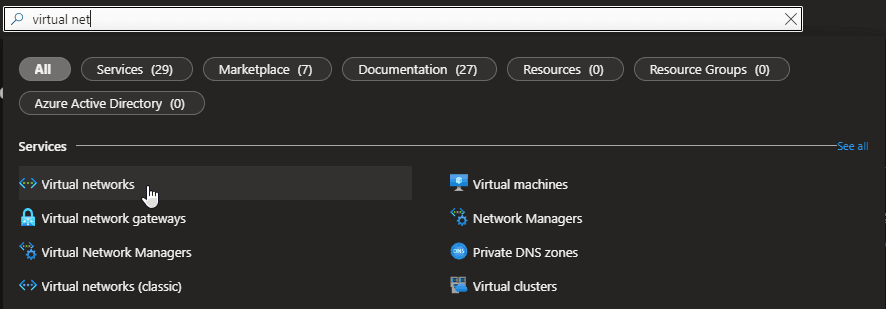
Let’s start with the configuration of the Azure VPN Gateway. First, we need to create a virtual network in Azure. You can search in the Azure services like this and click on Virtual Networks.
Creating a virtual network
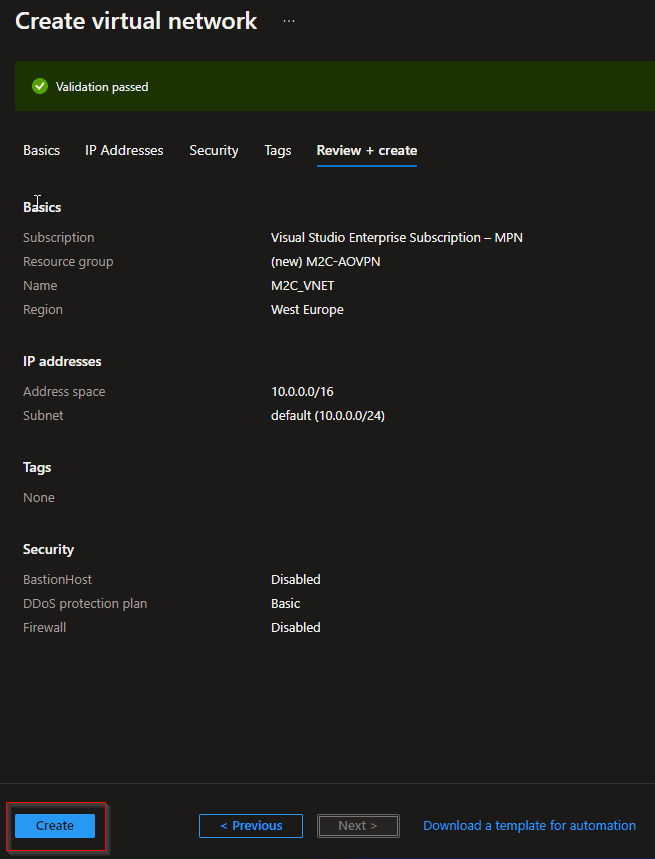
Create a VNet using the following values:
- Resource group: M2C-AOVPN
- Name: VNet1
- Region: West Europe
- IPv4 address space: 10.1.0.0/16
- Subnet name: default
- Subnet address space: 10.1.0.0/24
- Sign into the Azure portal.
- In Search resources, service, and docs (G+/), type virtual network. Select Virtual network from the Marketplace results to open the Virtual network page.
- On the Virtual network page, select Create. This opens the Create virtual network page.
- On the Basics tab, configure the VNet settings for Project details and Instance details. You’ll see a green check mark when the values you enter are validated. The values shown in the example can be adjusted according to the settings that you require.
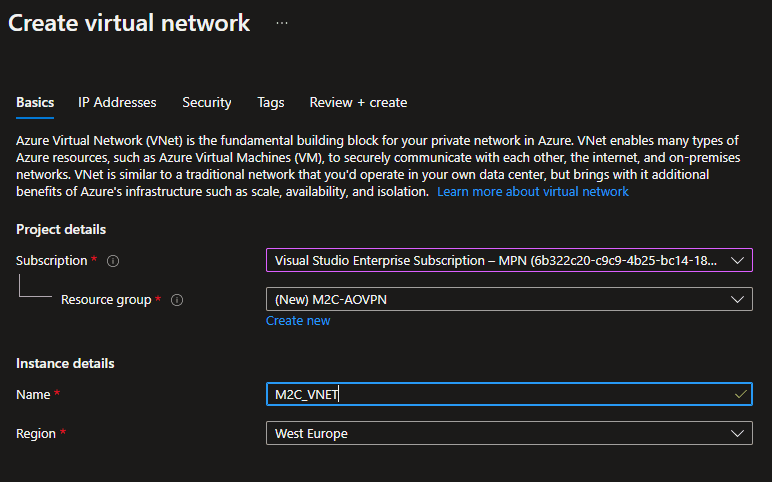
- Subscription: Verify that the subscription listed is the correct one. You can change subscriptions by using the drop-down.
- Resource group: Select an existing resource group, or select Create new to create a new one. For more information about resource groups, see Azure Resource Manager overview.
- Name: Enter the name for your virtual network.
- Region: Select the location for your VNet. The location determines where the resources that you deploy to this VNet will live.
- Select IP Addresses to advance to the IP Addresses tab. On the IP Addresses tab, configure the settings. The values shown in the example can be adjusted according to the settings that you require.
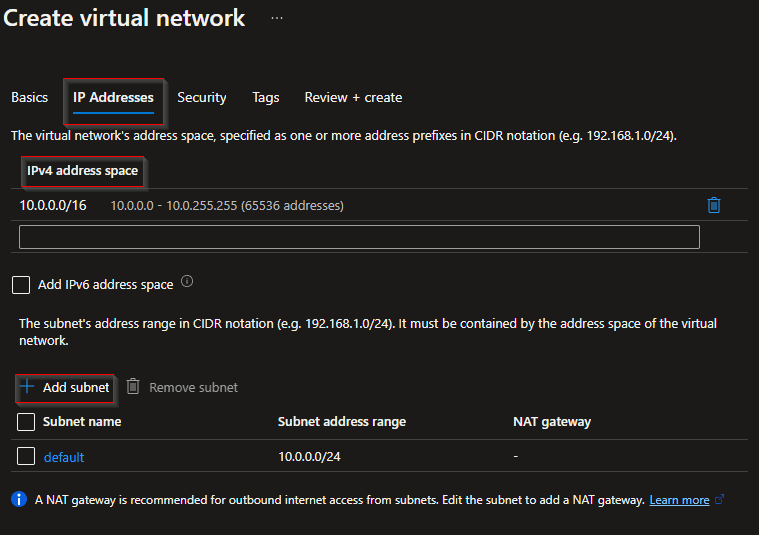
- IPv4 address space: By default, an address space is automatically created. You can select the address space and adjust it to reflect your own values. You can also add more address spaces by selecting the box below the existing address space and specifying the values for the additional address space.
- + Add subnet: If you use the default address space, a default subnet is created automatically. If you change the address space, you need to add a subnet. Select + Add subnet to open the Add subnet window. Configure the following settings, then select Add at the bottom of the page to add the values.
- Subnet name: In this example, we named the subnet “FrontEnd”.
- Subnet address range: The address range for this subnet.
- Select Security to advance to the Security tab. At this time, leave the default values.
- BastionHost: Disable
- DDoS Protection Standard: Disable
- Firewall: Disable
- Select Review + create to validate the virtual network settings.
- After the settings have been validated, select Create to create the virtual network.
Now we have created a VNET, so it’s time to create an Azure VPN Gateway. If you already have an Azure VPN Gateway and the SKU is not Basic. Then you can skip the creation part.
Creating an Azure VPN Gateway
In this step, you create the virtual network gateway (VPN gateway) for your VNet. Creating a gateway can often take 45 minutes or more, depending on the selected gateway SKU.
The Basic SKU type is not supported for the Always On VPN in Azure. We are going to need IKEv2 as authentication method. This is not available in the Basic SKU.
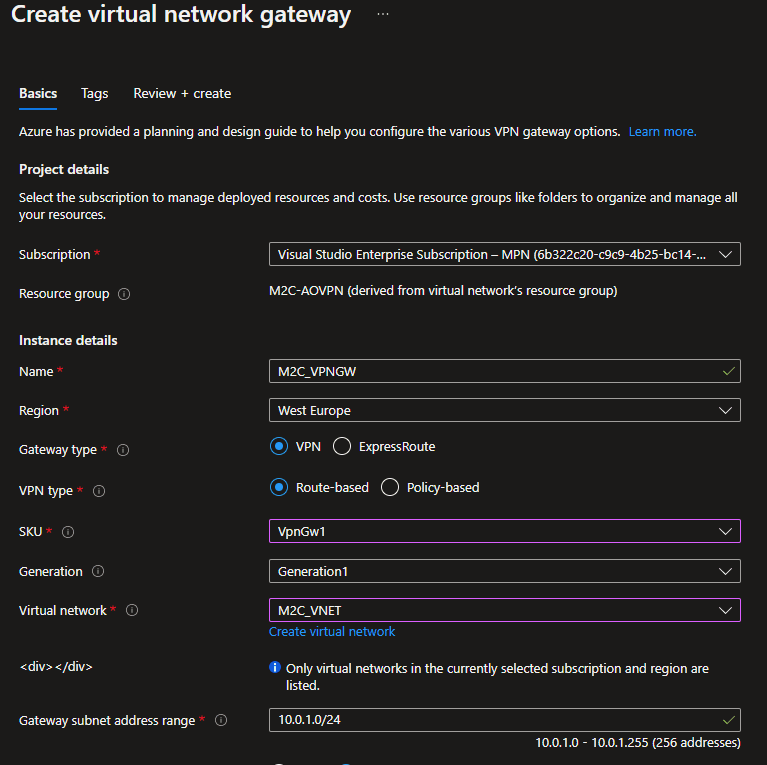
Create a virtual network gateway using the following values:
- Name: M2C_VPNGW
- Region: West Europe
- Gateway type: VPN
- VPN type: Route-based
- SKU: VpnGw1
- Generation: Generation 1
- Virtual network: M2C_VNET (Your name of the VNET)
- Gateway subnet address range: 10.1.255.0/27
- Public IP address: Create new
- Public IP address name: M2C_VPNGWpip
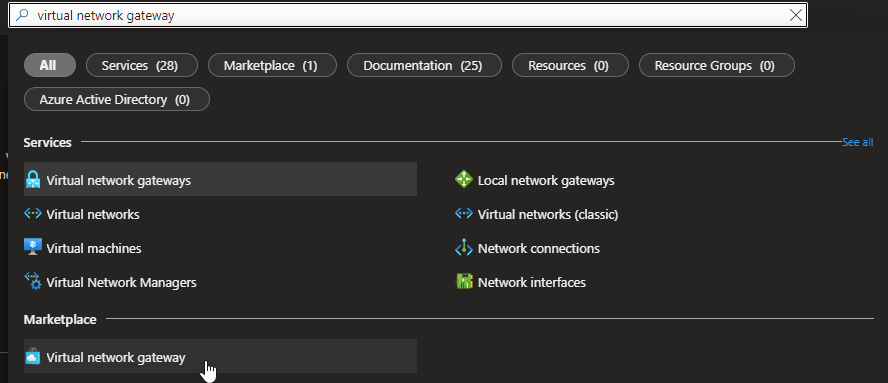
- In Search resources, services, and docs (G+/) type virtual network gateway. Locate Virtual network gateway in the Marketplace search results and select it to open the Create virtual network gateway page.
- On the Basics tab, fill in the values for Project details and Instance details.
- Subscription: Select the subscription you want to use from the dropdown.
- Resource Group: This setting is autofilled when you select your virtual network on this page.
- Name: Name your gateway. Naming your gateway not the same as naming a gateway subnet. It’s the name of the gateway object you’re creating.
- Region: Select the region in which you want to create this resource. The region for the gateway must be the same as the virtual network.
- Gateway type: Select VPN. VPN gateways use the virtual network gateway type VPN.
- VPN type: Select the VPN type that is specified for your configuration. Most configurations require a Route-based VPN type.
- SKU: Select the gateway SKU you want to use from the dropdown. The SKUs listed in the dropdown depend on the VPN type you select. Make sure to select a SKU that supports the features you want to use. For more information about gateway SKUs, see Gateway SKUs.
- Generation: Select the generation you want to use. For more information, see Gateway SKUs.
- Virtual network: From the dropdown, select the virtual network to which you want to add this gateway. If you can’t see the VNet for which you want to create a gateway, make sure you selected the correct subscription and region in the previous settings.
- Gateway subnet address range: This field only appears if your VNet doesn’t have a gateway subnet. It’s best to specify /27 or larger (/26,/25 etc.). This allows enough IP addresses for future changes, such as adding an ExpressRoute gateway. We don’t recommend creating a range any smaller than /28. If you already have a gateway subnet, you can view GatewaySubnet details by navigating to your virtual network. Select Subnets to view the range. If you want to change the range, you can delete and recreate the GatewaySubnet.
- Specify in the values for Public IP address. These settings specify the public IP address object that gets associated to the VPN gateway. The public IP address is dynamically assigned to this object when the VPN gateway is created. The only time the Public IP address changes is when the gateway is deleted and re-created. It doesn’t change across resizing, resetting, or other internal maintenance/upgrades of your VPN gateway.
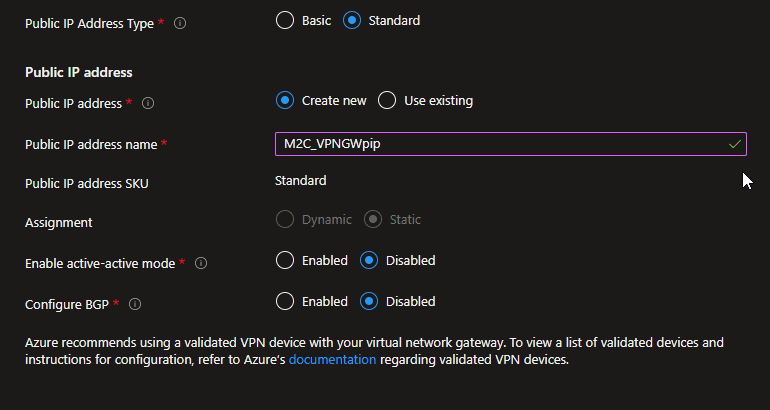
- Public IP address type: In most cases, you want to use the Basic Public IP address type. If you don’t see this field on the portal page, you may have selected a gateway SKU that pre-selects this value for you.
- Public IP address: Leave Create new selected.
- Public IP address name: In the text box, type a name for your public IP address instance.
- Public IP address SKU: This field is controlled by the Public IP Address Type setting.
- Assignment: VPN gateway supports only Dynamic.
- Enable active-active mode: Only select Enable active-active mode if you’re creating an active-active gateway configuration. Otherwise, leave this setting Disabled.
- Leave Configure BGP as Disabled, unless your configuration specifically requires this setting. If you do require this setting, the default ASN is 65515, although this value can be changed.
- Select Review + create to run validation.
- Once validation passes, select Create to deploy the VPN gateway.
A gateway can take 45 minutes or more to fully create and deploy. You can see the deployment status on the Overview page for your gateway. After the gateway is created, you can view the IP address that has been assigned to it by looking at the virtual network in the portal. The gateway appears as a connected device.
When working with gateway subnets, avoid associating a network security group (NSG) to the gateway subnet. Associating a network security group to this subnet may cause your virtual network gateway (VPN and Express Route gateways) to stop functioning as expected.
Configuring the Azure VPN Gateway for the device VPN tunnel
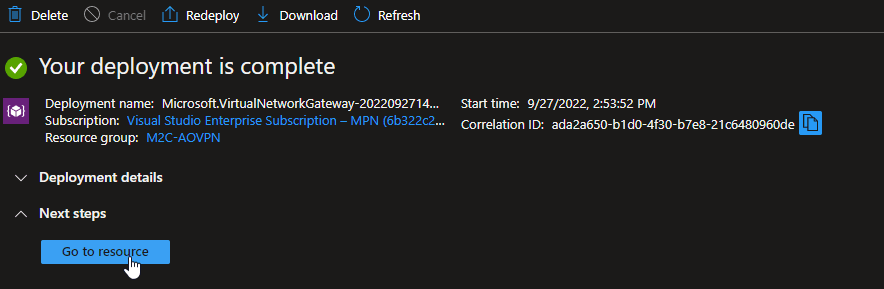
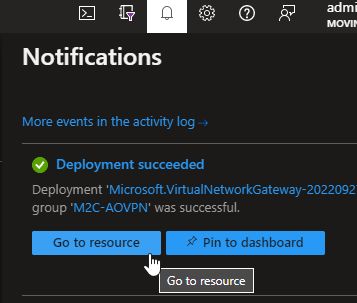
If the deployment is completed, you can go to the resource directly by pushing Go to resource. Or else you can click on in from the notifications.
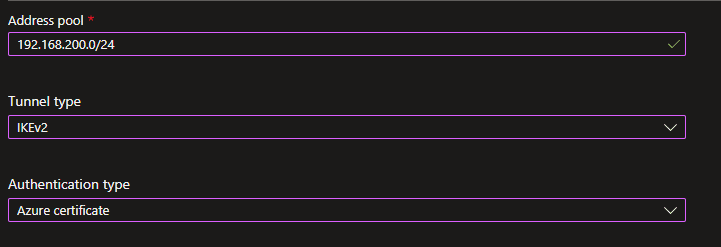
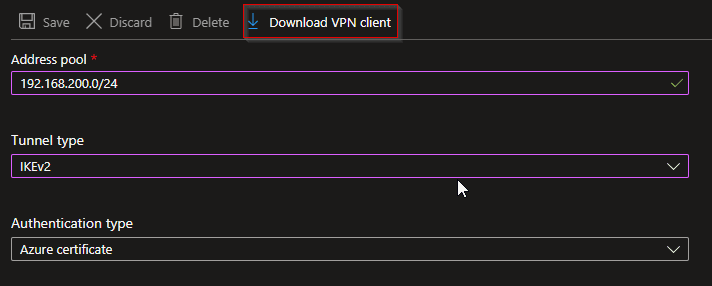
- First, we need to configure the Point-to-site configuration. By clicking on Point-to-site configuration and then on the text Configure now. Now we can fill in some fields for the Point-to-site configuration.
- Address pool: 192.168.200.0/24 (Choose the correct VPN client subnet, because devices will get addresses from this subnet)
- Tunnel type: IKEv2
- Authentication type: Azure certificate
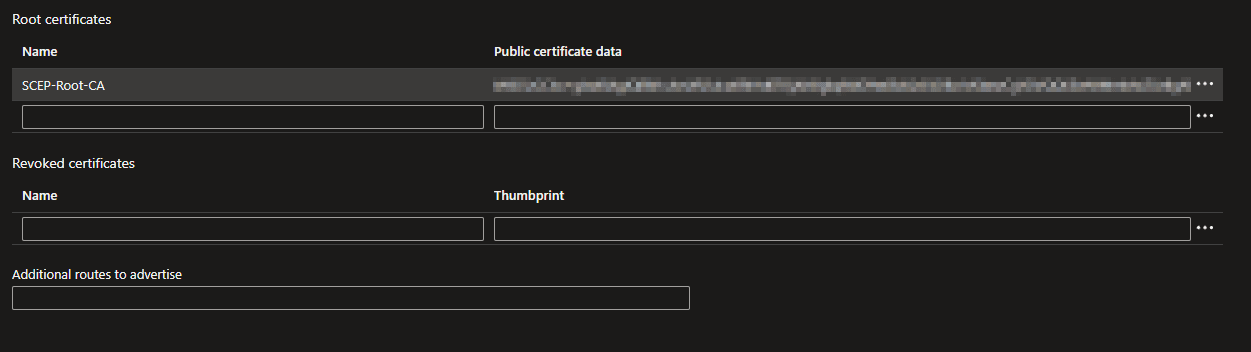
- Now you need to configure the root certificate from your PKI environment. For an on-premise Windows PKI environment you can easily export the certificate with the following command on the Windows server. Or use certmgr.msc to export it from the Computer Store in the Trusted Root.
certutil -ca.cert C:\RootCA_name.cerNow you can open this file and copy the content between BEGIN CERTFICATE and END CERTIFICATE in the field of Public certificate data. Enter a name for the Root Certificate.
- All the other fields can be left blank. Then you can click on Save and wait until the configuration is finished.
Please check out my post about SCEPMAN and use a PKI environment in Azure. This also works for the Always on VPN.
- Download the VPN Client so you can see the VPN Gateway URL for a VPN profile in Microsoft Intune.
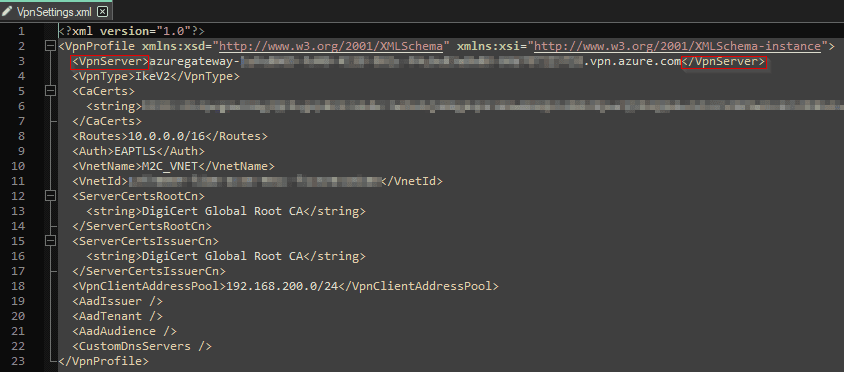
- Open the ZIP file and go to the directory Generic. Here is a file named VpnSettings.xml. Open this file and check the third line in this file. The text between <VpnServer> </VpnServer> needs be saved for the creation of a VPN profile in Microsoft Intune. Check the following screenshot for the correct line.
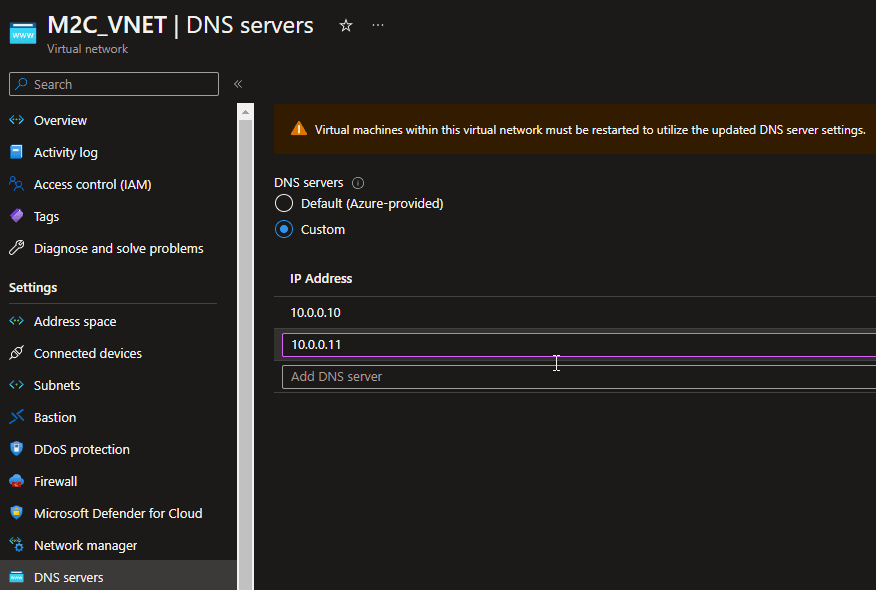
- Now everything is in place for the Azure VPN Gateway. Make sure your VNET is configured for connectivity to the resources. If your VNET needs certain custom DNS servers. Then these need to be provided in the VNET. Because your VPN Client subnet will use the VNET for DNS resolving. Be aware of the warning message. If you change the DNS settings within the VNET, all the Azure VM’s in that VNET need to be restarted.
Creating the device configuration profiles for the device VPN tunnel
The Azure VPN Gateway is ready to connect, but first we need to configure some profiles in Microsoft Intune to connect to the VPN. The following profiles should be created.
- Trusted certificate profile (Windows 10 and later)
- SCEP certificate profile (Windows 10 and later)
- VPN profile (Windows 10 and later)
Assigning to the same group as the SCEP Certificate profile is important, or else the deployment of the SCEP Certificate will fail.
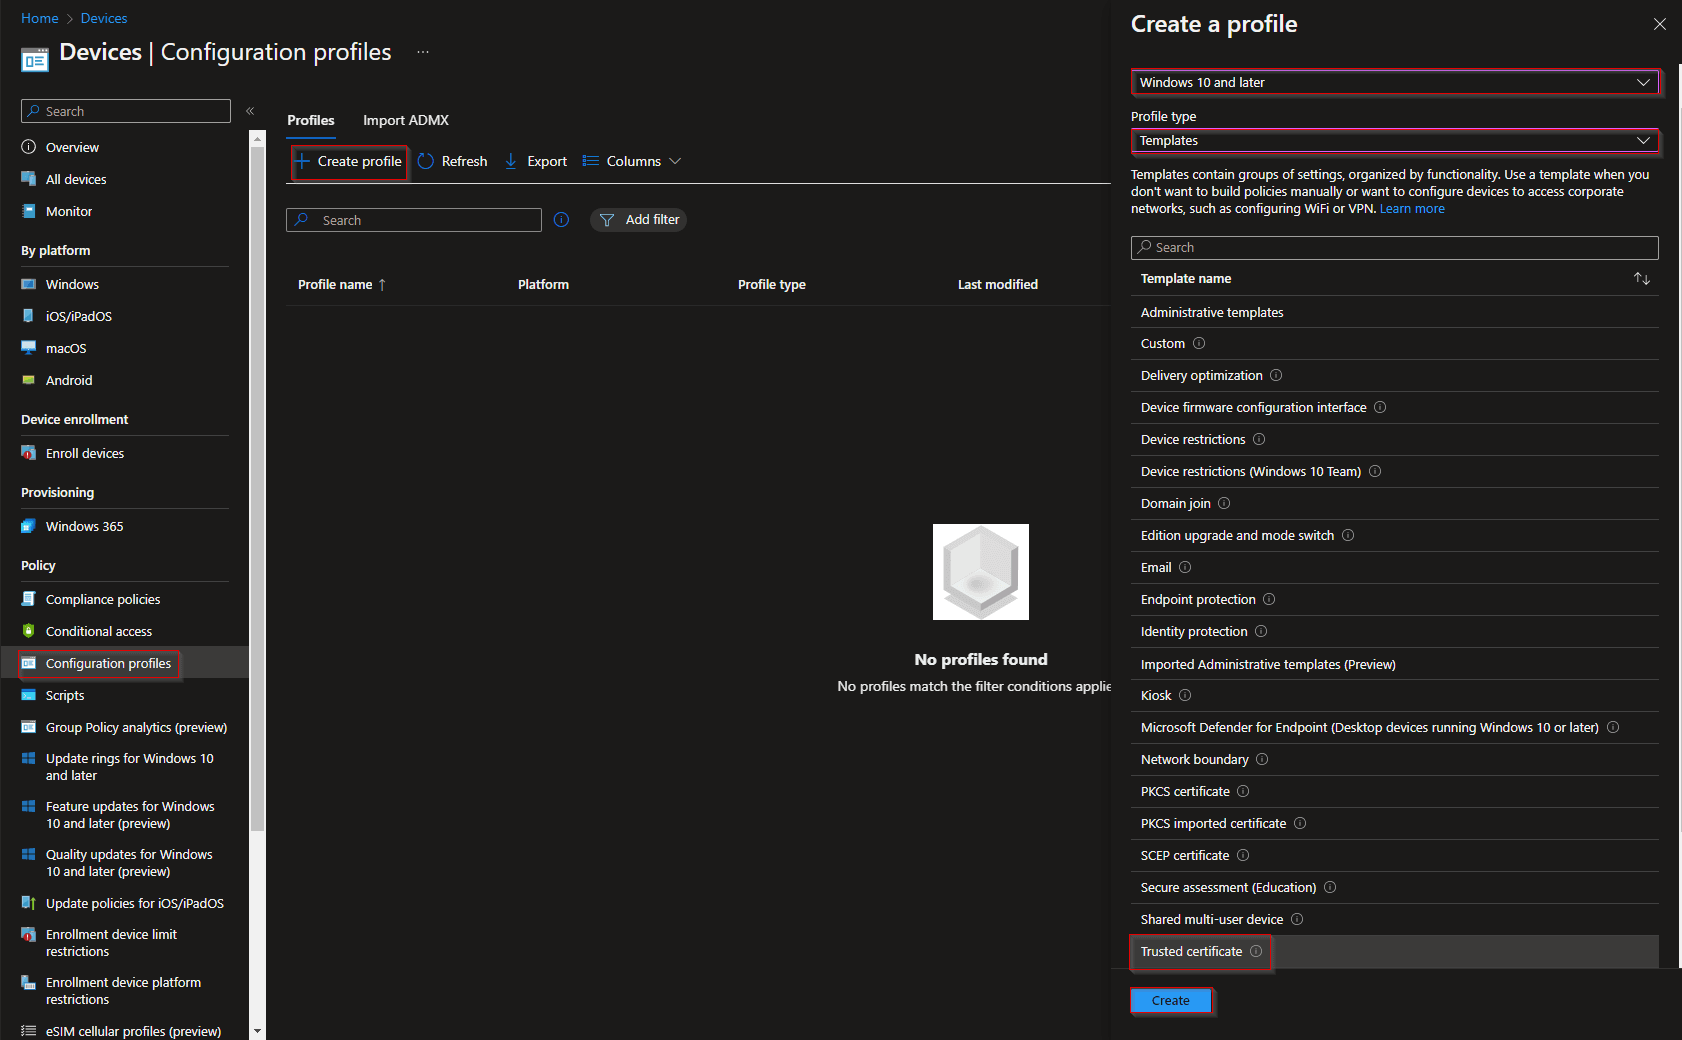
- in this step we are going to configure certificate profiles for Windows 10 and later in Microsoft Intune to use for security purposes. First we start with the Root certificate. Please use the certificate you gathered from your PKI environment. Go to the portal of Microsoft Intune. And create a Configuration Profile for Windows 10 and later and choose Templates and click on Trusted certificate and click on Create. Now you can upload your .CER file and assign this profile to the same group as the SCEP certificate.
For the next step you need to configure NDES in your environment. It is possible to use a cloud service like SCEPman to replace your NDES environment. If you want to use NDES, please follow this guide from Microsoft: How to configure NDES
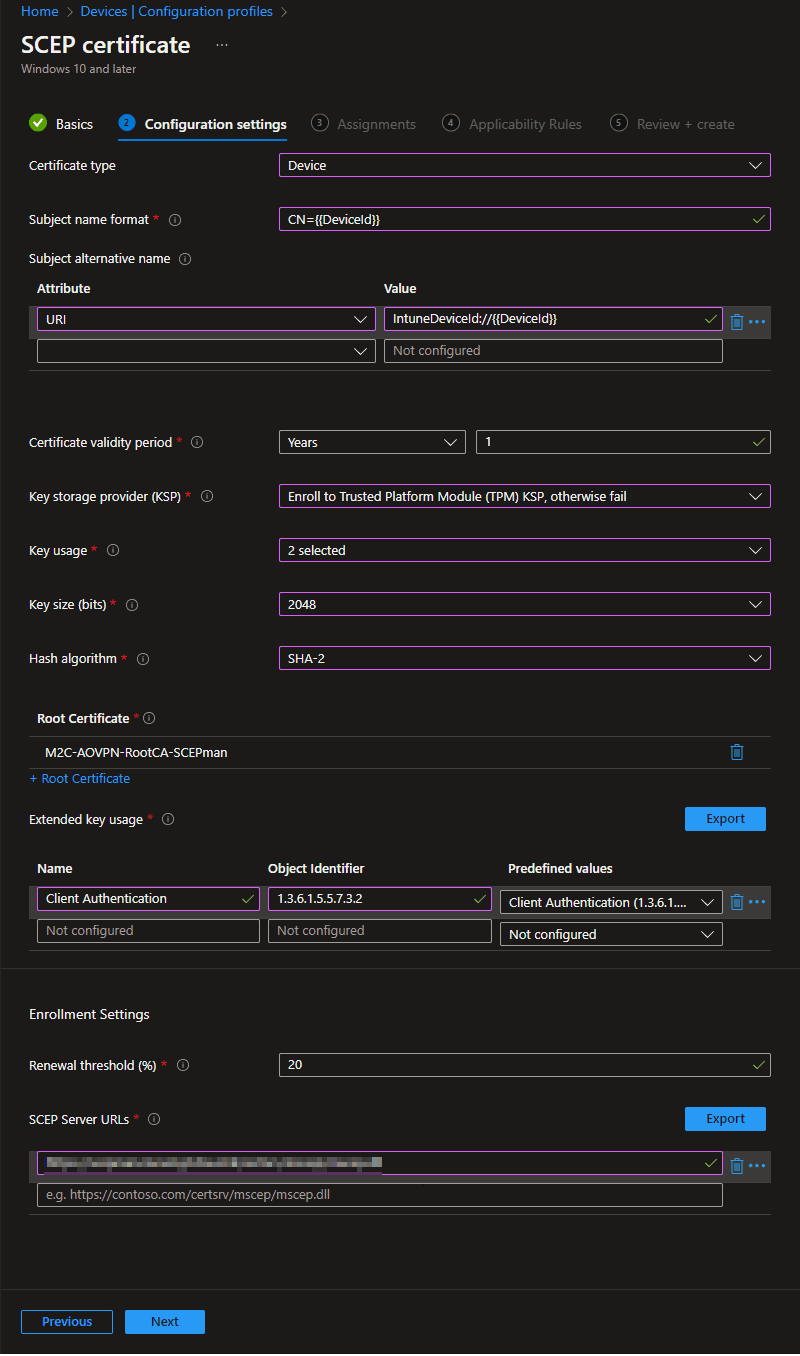
- Now we are going to configure the Device Certificates for the Always On VPN in Windows 10 or later. First you need to create a Configuration profile. Click on Windows 10 or later and then on Templates and search for SCEP. Now you will find SCEP certificate. Configure this profile as the following picture. The SCEP Server URL at the last part should look something like this: https://ndes.contoso.com/certsrv/mscep/mscep.dll
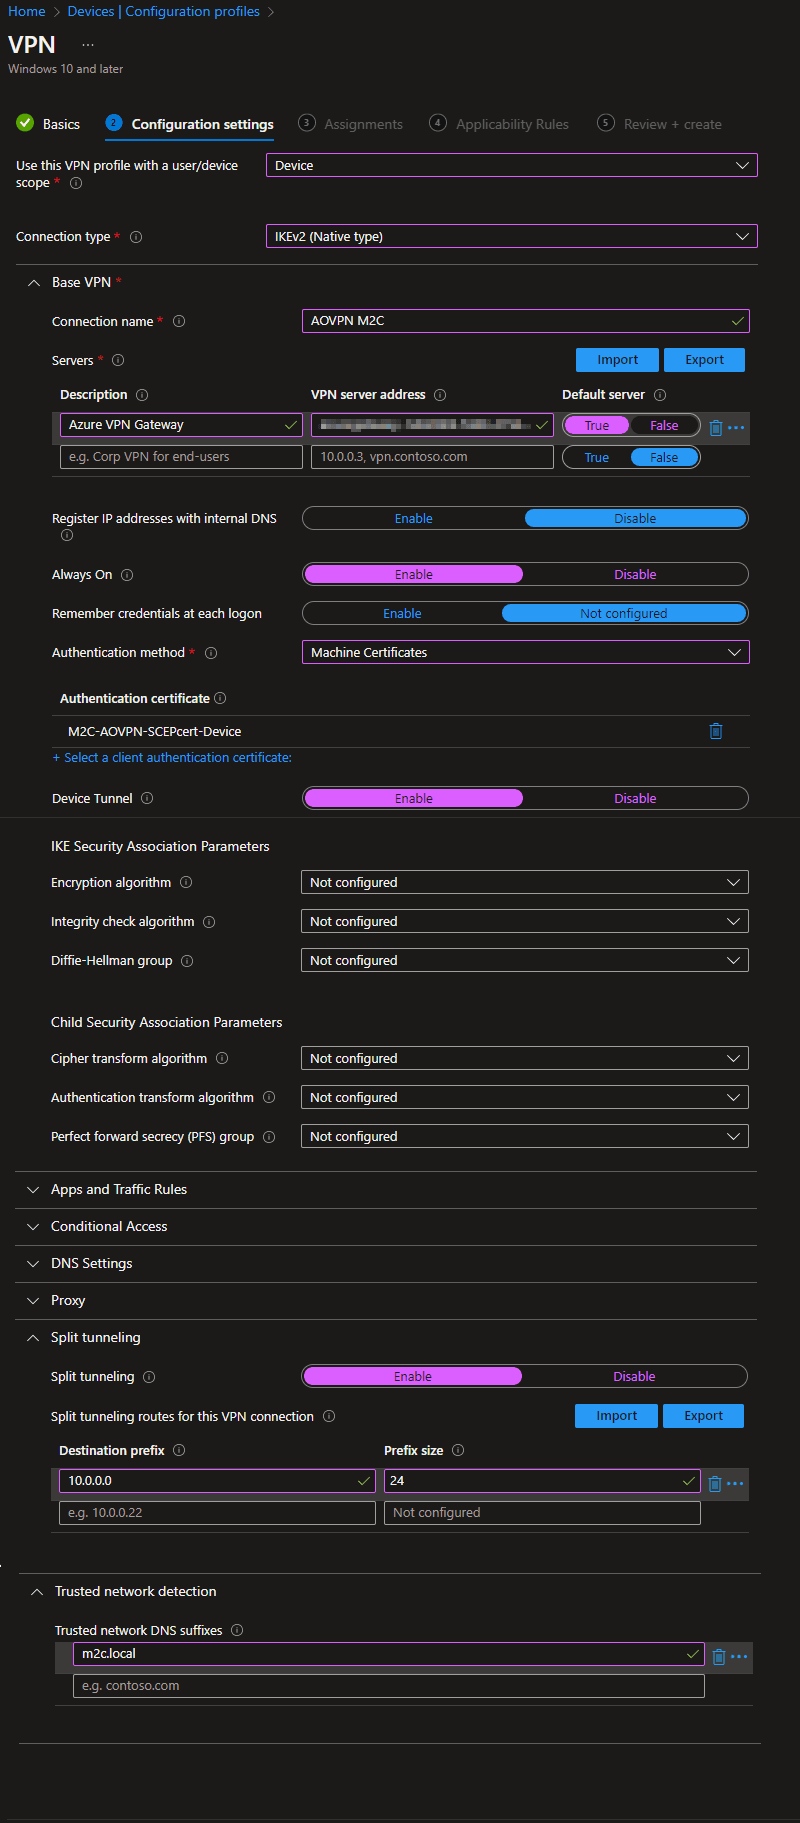
- If the certificates profiles are in place, you can configure the VPN profile. We are going to create a Configuration Profile. Click on Create profile and then on Windows 10 and later. Then you click on Templates and go to VPN. Now we are going to configure the settings in the profile. We are going to configure the following values (If some values are not mentioned, they are left on default settings):
- Use this VPN profile with a suer/device scope: Device
- Connection type: IKEv2 (Native type)
- Base VPN
- Connection name: AOVPN M2C (Please choose your own name)
- Servers: Description: Azure VPN Gateway (Choose your own name), VPN server address: (Azure VPN URL from file VpnSettings.xml), Default server: True
- Always On: Enable
- Authentication Method: Machine Certificates
- Select the SCEP certificate profile from our previous step
- Device tunnel: Enable
- Split tunneling (This is required for the Device tunnel)
- Split tunneling: Enable
- Destination prefix: 10.0.0.0, Prefix size: 24 (This is the range within my VNET in Azure. Be aware that the split tunnel represents your subnet connectivity over the VPN. The VPN Client subnet will push VPN traffic over this selected destination prefix.)
- Trusted network detection (If you are working internally, the VPN will not connect) (If you want to use the VPN also internally, then leave this field blank)
- Trusted network DNS suffixes: m2c.local (Please use your own local domain name from your Active Directory)
When the configuration is done, please assign the same device group as the certificate profiles.